

| Home | About Us | Services | Products | Support | Contact Us |
Go to the router web front-end in your router (which will require your administration password) and click on Configuration Security. You should get a display rather like fig.1
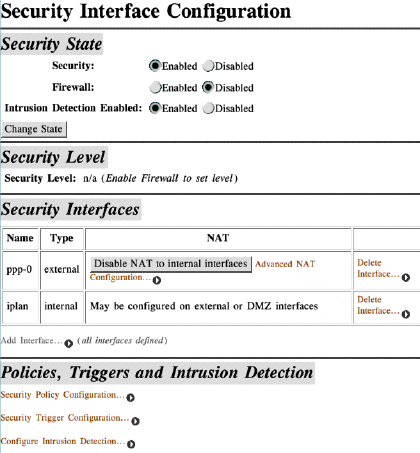
Fig.1 Initially configuring the Firewall
The default setting is for the firewall to be off. Turn it on, by clicking the Firewall: Enabled button and then clicking on Change State. This will enable the firewall and enter a High security level. There are four security levels; none, high, medium and low. I would recommend going for the high one. This will give maximum security, but will require you to set up all the rules for the services you require. Initially, everything will be firewalled, so you won't be able to connect to the internet. Don't worry!
When you initially enable the firewall with a high security level, everything will be unavailable, so you will need to configure which services you want to allow through the router. Initially this will be 'essential' services such as web browsing, email receiving and sending and perhaps newsgroup access.
At the bottom of the window (fig.1) you will see links for setting policies, triggers and intrusion detection. Ignore the Triggers and Intrusion Detection for the time being.
Click on the Security Policy Configuration link. You will see a list of current security policies - at this stage, no policies will be defined.
To define a new policy, click on New Policy... then you want to create a new policy between the external and internal interfaces with the validators blocking traffic.
You should now see a table rather like fig.2
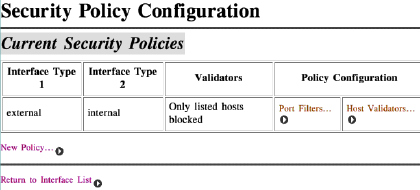
Fig.2 Security Policy Configuration
To create a new firewall rule, click on Port Filters... and you'll then be asked if you want to add a new TCP Filter, UDP Filter, Raw IP Filter or return to the previous menu pages.
I'll describe how to setup a couple of new rules (to get your web access back) but after that, it's basically just a case of repeating the process to add new filters for each service you require.
Click on Add TCP Filter and you should be presented with a screen rather like fig.3
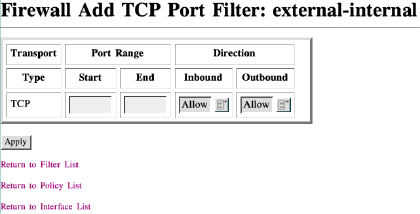
Fig.3 Adding a new Port Filter
You need to enter the port range (generally the same for Start and End) and whether or not to allow inbound or outbound traffic. Unless you are running services on internal servers, I would advise blocking all Inbound traffic unless a particular service requires it. This means that any traffic you initiate will be allowed to LEAVE your router, but any incoming traffic will be blocked. Thus, to setup web access, enter 80 for both Start and End ports, then set Inbound to Block and Outbound to Allow. If you're running a webserver which you want to let people access from the outside world, set Inbound to Allow too.
When you click Apply it will add the rule and you should find that you can now gain external web access back.
I'll now describe how to allow incoming email reception. You want to repeat the process by clicking on Add TCP Filter but this time enter 110 for both the Start and End port ranges (port 110 is for POP3 - receiving email). Set Inbound to Block and Outbound to Allow. Then click Apply. You should now be able to download email.
Of course, receiving email is not much good if you can't send email, so next you need to allow STMP (sending email) which uses port 25. Repeat the process, Add TCP Filter and enter 25 for both the Start and End port ranges (port 25 is SMTP). Set Inbound to Block and Outbound to Allow. Then click Apply. You should now be able to send email.
One essential service to allow is DNS (Domain Name Server) which is what looks up internet addresses and converts them to IP addresses. Although complicated sounding, this is required for internet web addresses to be resolved correctly. As this service requires both TCP and UDP ports to be enabled you need to repeat the process above, once for adding a new TCP Filter and once for adding a new UDP filter.
Click on Add TCP Filter and enter 53 (port for DNS) in both Start and End port ranges, then set Inbound to Block and Outbound to Allow. Click Apply.
Now click on Add UDP Filter and enter 53 (port for DNS) in both Start and End port ranges, then set Inbound to Block and Outbound to Allow. Click Apply.
By now the port filter table should look something like fig.4
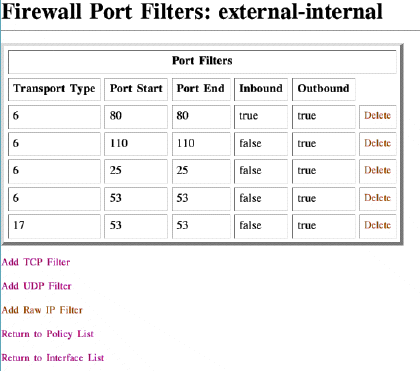
Fig.3 Firewall Port Filters
Hopefully by now you should understand the process of adding new port rules for the services you require. The only thing you may not understand is what the various port numbers mean and which services they apply to. To help you out here, I've created a table (below) containing all the common or popular ports and services (all the ones I have setup on my own router) which will enable you to see which additional services you may want to add to your firewall rules.