

| Home | About Us | Services | Products | Support | Contact Us |
Introduction
These instructions have been written using a Solwise SAR-715 ADSL router with firmware 8.2 SR2 but the general principal of configuration should work with other models.
To start:
When you unpack the SAR-715, it has a default 'factory set' IP address of 192.168.7.1 with a subnet of 255.255.255.0 so you will need to configure your computer to have an IP address on the same subnet in order to initially access the router web front-end. I would advise temporarily changing your computer's IP address to 192.168.7.2
To do this, go to the RISC OS network configuration panel and set the IP address to 192.168.7.2 and netmask to 255.255.255.0, then reboot the computer. If all is well you should be able to ping the router (by pressing f12 and entering the command *ping 192.168.7.1)
Assuming you can talk to the router....
Assuming your computer can 'see' the router, you can now start configuring it.
Load Oregano (which seems to be the best RISC OS browser for configuring the Solwise routers) and go to URL 192.168.7.1 and you should get the router ADSL Configuration Page (fig.1)
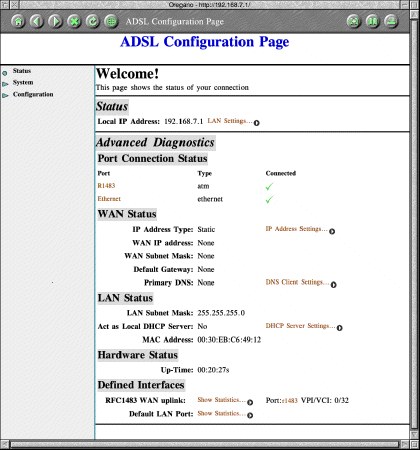
Fig.1 Solwise Default Configuration Page
The first thing to do is to re-configure the routers IP address to an IP address suitable for your local network. If you only have a single computer or have a local network on the 192.168.7.x range, then you don't need to change the router IP address.
My personal local network is on the 10.1.1.x range, so I will describe how to change the IP address of the router - bearing in mind that as soon as you do so from the web front-end, you will need to reconfigure the IP address of your computer again so that you can still talk to the router!
Before you can do any system administration functions on the router, it will ask you for an administrators password. By default this is admin/admin for the username and password. You will want to change this as soon as you've setup the router!
To set the IP address of the router, click on the 'LAN Settings' link in the status part of the web front-end. This will give you an input window like that in fig. 2. Enter the required IP address and netmask, then click Apply.
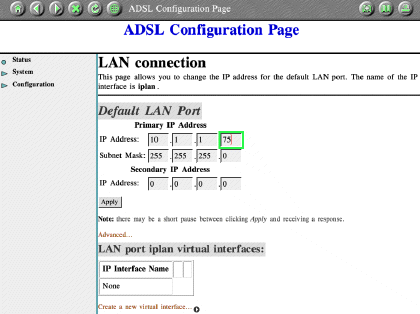
Fig.2 Setting the Router IP Address and Netmask
When you click Apply the router will change it's primary IP address and probably give you a warning about changing your computer's IP address so that you can continue configuring the router. Don't worry about any warnings given about renewing DHCP leases. We're using a fixed IP address to access it.
Before you can access the router again you will need to reset the IP address on your computer again.
Configuring your ISP Broadband account details
The next thing you need to do is to configure the router with your broadband account details, which should enable you to connect to the internet. There are a number of standard settings you need to make, along with various account specific details - such as your username and password etc (given by your broadband supplier).
Click on IP Address Settings from the WAN (Wide Area Network or 'internet') status section of the router's web front-end. Again, you may be asked for the router admin password.
You will see a screen something like fig.3 which shows a default service defined. Delete ALL current services.
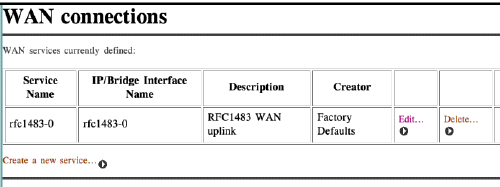
Fig.3 Delete the default WAN connections
It will ask you for confirmation, so confirm that you want to delete the connections. You should now see a screen similar to fig.3 but wih no WAN services currently defined.
Click on Create a new service...
You will be asked the type of service you wish to create. This is likely to be PPPoA but confirm with the information your broadband supplier gave you when you opened your account. Therefore click on PPPoA routed and click Configure.
You should now see a configuration panel something like fig.4
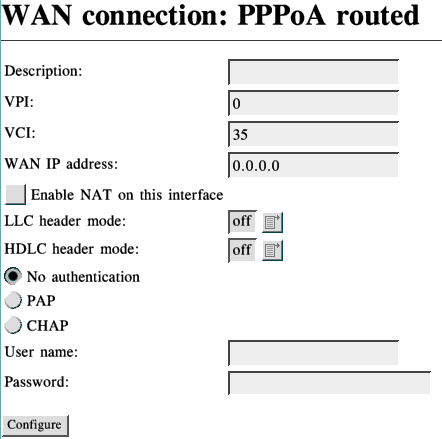
Fig.4 Configuring your ISP details
You can now enter the details your ISP should have provided you with;
The Description should be something like 'Demon' (the name of your ISP).
VPI should be set to 0 and VCI should be set to 38 if you are using a BT line.
If your ISP has given you a static IP address, enter it in the WAN IP address box, otherwise just leave it as it is.
Tick the Enable NAT on this interface option.
Ignore the LLC header mode and HDLC header mode (should both be off) for the moment.
You want CHAP authentication, so select that option.
You now need to enter the username and password that your ISP supplied you with. Enter these in the boxes provided and then click Configure
You will now see a display similar to fig.3 but with your newly created service.
Now click on the Configuration link in the navigation panel on the left and click on ZIPB. Enture this is enabled, by clicking on the relevant button.
Go to the Configuration Security settings and click on Add Interface (underneath the Security Interfaces table). Select an iplan interface type of internal and click on Apply. We will configure the rest of the security settings later.
Saving Settings and Resetting
You can now save the settings you've made and reboot the router for the new settings to take effect.
Click on Configuration Save config and click Save. After a slight delay the settings should be saved to the routers internal memory.
Now click on System Restart and click on the Restart button (make sure the 'Reset to factory default settings' is OFF (or you'll have to start again from step 1)
The Router will now reboot itself and there will be a delay of about a minute before it restarts. Wait a minute and then click on the 'Status' link or refresh your browser window. If all is well, you should have a green tick next to the R1483M port connection status. This indicates that your router is now successfully connected to your ISP broadband connection.
If all is well, you should now be able to view external web pages in your web browser.
Additional Configuration
Once you have a working broadband connection, you should immediately reset the router's administrator password to something more secure;
Click on the Configuration Authentication link on the navigation bar on the router web front-end. Delete all the default users EXCEPT the admin user.
Click on Edit user... for the admin user. The existing details will be shown (with the password appearing as *'s). Click in the password box and delete the existing password (*'s), then enter a new one - which you should REMEMBER!! Make sure the May login? is set to true or you won't be able to login to the web front-end.
Click Apply and the new settings should take effect.
N.B. If you require additional security you may want to create a specific user (such as fbloggs and set a password, remembering to set 'May login?' and then delete the 'admin' user. This way you can login and administer the router via a private username and password for additional security.
I would also advise enabling the built-in firewall. This is quite complex so I've created an additional Solwise Firewall Configuration page which provides all the relevant settings.
If you want to run web servers or additional internal services which you want to make available to the outside world you will additionally need to configure the NAT settings.